After a short break for a 9-5 job and the birth of my son, I’ve finally returned to my blog to continue the Building Hashicorp Nomad Cluster With Raspberry Pi series.
Previously, we built a prototype of our Nomad cluster and even set up persistent network volumes for our jobs. Now, let’s step back briefly and talk about optimizations. Today, we will optimize network traffic and improve job-building speed by introducing a local Docker registry and a Docker pull-through cache.
Why does this matter?
Firstly, we really don’t want to share our innovative applications with DockerHub or pay for private repositories.
Secondly, we aim to speed up Docker push/pull operations. Even if you have a high-speed internet connection, bandwidth to DockerHub might still limit you. We also want the ability to keep working even if there is a network outage outside our home.
What is a Docker pull-through cache?
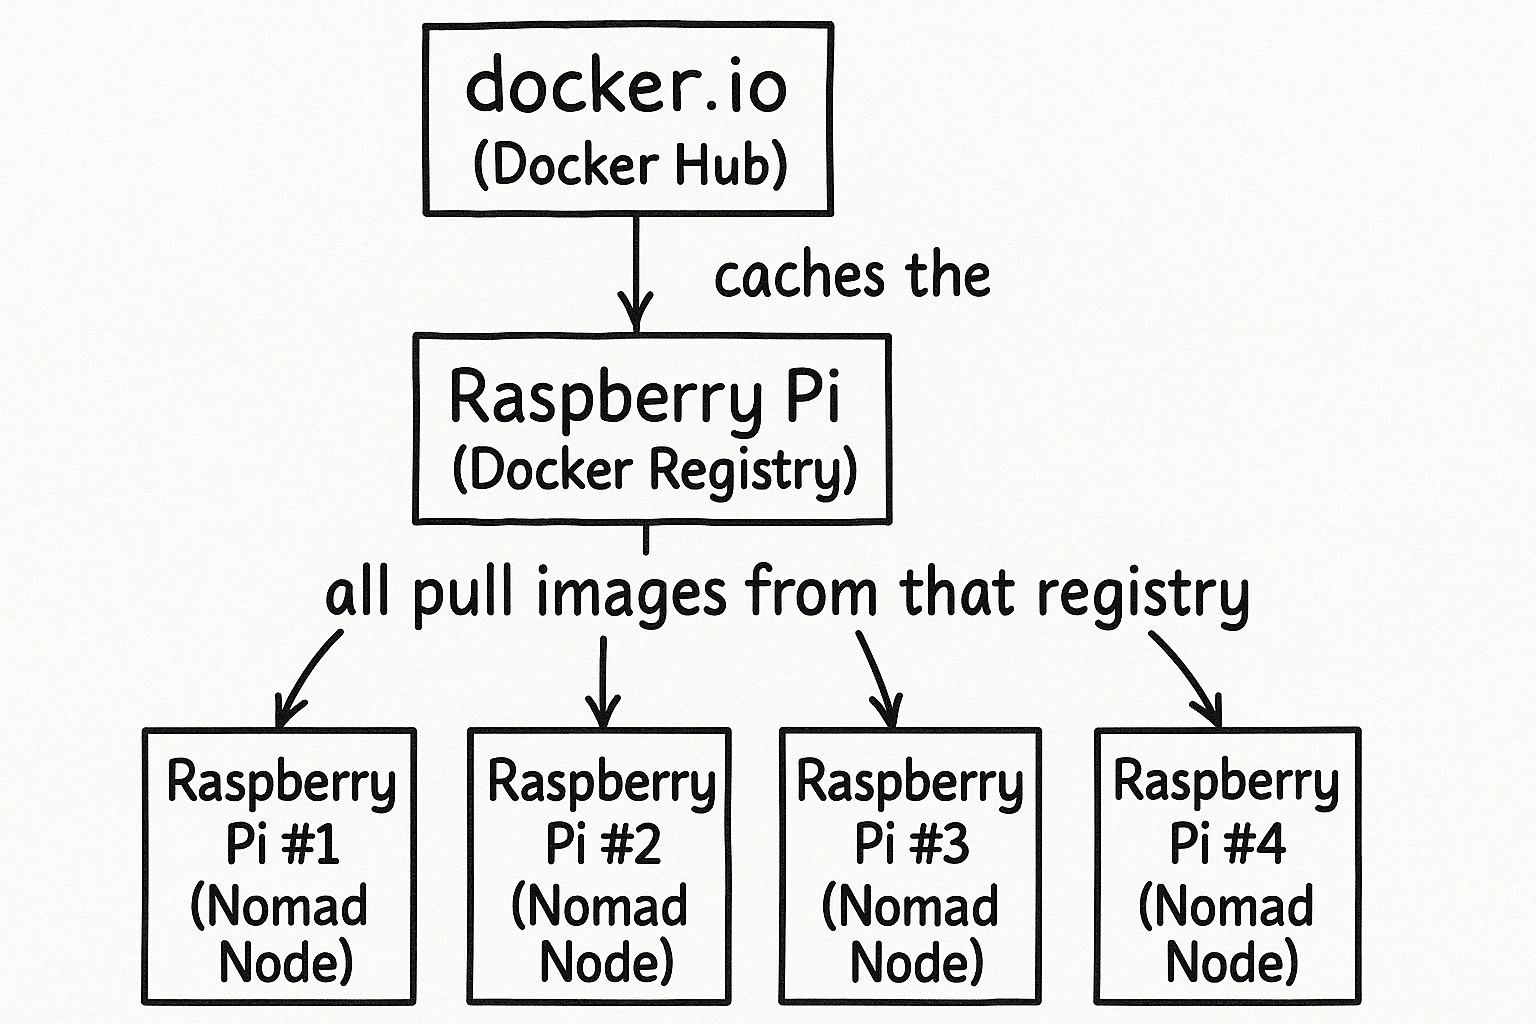
A Docker pull-through cache is a special Docker registry that acts as a caching layer between you and external Docker registries. When properly configured, it transparently caches Docker images within your local network without any noticeable difference.
When you pull images, you’ll communicate with your local cache. If the requested image isn’t already cached, the local cache retrieves it from DockerHub and stores it locally for future use.
Sounds good, right?
Deploying Docker pull-through cache on a Nomad cluster
Despite my year-long blog hiatus, I’ve actively maintained my homelab. Initially, I thought deploying the Docker registry and pull-through cache on my Nomad cluster was a brilliant idea. However, after several struggles, I realized that critical infrastructure components shouldn’t reside inside a cluster that could potentially fail.
Imagine your cluster goes down due to node failures, memory overload, network outages, or regular maintenance. If your Docker registry is part of this cluster, restarting the cluster becomes a loop: the cluster cannot restart because it can’t download necessary images, and it can’t download images because the registry is down, waiting for the cluster to restart.
Of course, you can build a highly resilient cluster, but a better architectural strategy is separating concerns. The Docker registry, being simpler and critical for the cluster, should run separately to minimize interdependent risks.
This article summarizes six months of struggles followed by six months of relief after deploying the Docker registry on a dedicated node.
Choosing your stack
Adding a fifth node
My primary cluster has four Raspberry Pi nodes. We could reduce to three and dedicate one node entirely for the registry, but three nodes are the minimum for proper leader election. Losing one node in a three-node setup would stop the entire cluster. To avoid this, I added a fifth node dedicated to the registry.
The Docker registry node doesn’t need extensive resources; network I/O is the primary concern. Any available Raspberry Pi model is suitable, but I used an 8GB Raspberry Pi since I had it available.
For optimal performance, I highly recommend using an external SSD. Running on an SD card is not ideal because frequent reads and writes drastically reduce the card’s lifespan—trust me, my Sandisk SD card died after just one month of active development.
I formatted my 1 TB USB SSD , previously used for SMB storage, to repurpose it for this registry node.
Docker Compose
To simplify setup, I’ve decided on Docker Compose, as it neatly provides everything we need for a single-node environment.
Network setup

Efficient network traffic management is crucial, even within a local network.
I’ve opted for two network switches:
- Nomad Cluster Switch: Connects all Nomad nodes, isolating traffic strictly within the cluster, preventing interference from other home network traffic.
- Home Network Switch: Connects everything else, including the laptop, Docker cache node, and the Nomad switch itself. This connects directly to the internet router.
While not enterprise-level perfect, this setup effectively isolates Nomad traffic from the broader home network.
Installation
We use the official registry:2 Docker image. Later, we might explore more advanced options, but this setup is sufficient for the foreseeable future.
services:
  docker_cache:
    container_name: docker_cache
    image: registry:2
    ports:
      - "5000:5002"
    environment:
      REGISTRY_HTTP_ADDR: "0.0.0.0:5002"
      REGISTRY_STORAGE_FILESYSTEM_ROOTDIRECTORY: "/opt/docker_cache"
      REGISTRY_PROXY_REMOTEURL: "https://registry-1.docker.io"
      REGISTRY_PROXY_TTL: "186h"
    volumes:
      - './docker/cache:/opt/docker_cache'
    restart: unless-stopped

  docker_registry:
    container_name: docker_registry
    image: registry:2
    ports:
      - "5001:5001"
    environment:
      REGISTRY_STORAGE_FILESYSTEM_ROOTDIRECTORY: "/opt/docker_registry"
      REGISTRY_HTTP_ADDR: "0.0.0.0:5001"
    volumes:
      - './docker/registry:/opt/docker_registry'
    restart: unless-stopped
We have two containers because the registry image can operate either as a registry or a pull-through cache, but not both simultaneously. This separation provides clarity and structure.
Both services run locally without external exposure, so we skip authentication for now. Implementing authentication is possible but cumbersome with this basic image—I’ll cover modern, advanced registries in future articles.
Configure MacBook for the private registry and cache
On macOS:
- Open Docker Desktop and navigate to Settings.


- Under Docker Engine, add:
{
  "insecure-registries": ["192.168.5.250:5000", "192.168.5.250:5001"],
  "registry-mirrors": ["http://192.168.5.250:5000"]
}

“Insecure-registries” allows connections without SSL, and “registry-mirrors” redirects Docker pulls to our local cache.
Configure Nomad cluster
Update your Ansible setup from our previous article with this file:
docker-daemon.json
{
  "insecure-registries": ["192.168.5.250:5000", "192.168.5.250:5001"],
  "registry-mirrors": ["http://192.168.5.250:5000"]
}
Extend your Ansible playbook:
---
- hosts: pi-homelab-01
  become: yes
  tasks:
    ... previous tasks ...

    - name: 'Docker: Install docker registry mirror'
      copy:
        src: ./files/docker-daemon.json
        dest: /etc/docker/daemon.json

    - name: 'Docker: Restart daemon'
      systemd:
        name: docker
        enabled: yes
        state: restarted
I’ve updated the homelab repository. Check the full Docker playbook here .
Conclusion
Now, you have a private Docker registry and a pull-through cache, significantly enhancing network efficiency and job-building speeds.
Check out the updated infrastructure-as-code (IaC) in my GitHub repository: https://github.com/aka-toxa/bored-dev-homelab .